Introduction
-
This lesson will cover how to set up GitHub for your course
-
This assumes you’ve gone through the following lesson:
Getting Setup
-
Create an account or login to https://github.com
-
If it’s a new account, fill in the questionnaire
-
-
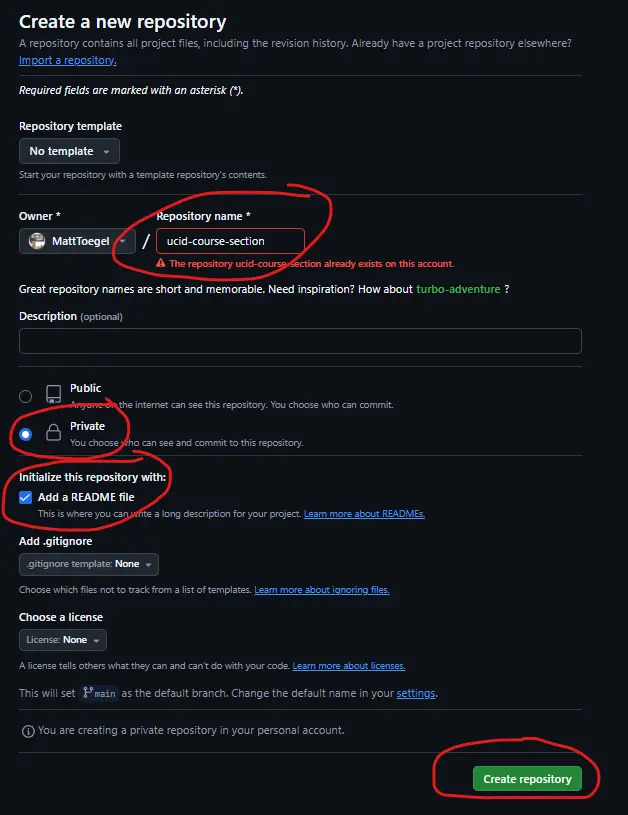
In the top right, click the
+and choose "New Repository" -
Name it
[ucid]-[course]-[section](i.e., mt85-IT000-000)-
Check "Add a README file"
-
Leave "Add .gitignore" blank as we’ll create this later on
-
Click "Create Repository"
-
|
Important
|
Don’t literally name it [ucid]-[course]-[section]
|

Software
-
Check for git
-
In your terminal type
git --version-
If you get output you have git but may need to update
-
If you don’t get output, follow the steps based on your OS here
-
-
Create Your Key
-
An SSH key is a secure method of authenticating with GitHub. It consists of a private key (kept secure) and a public key (shared with GitHub)
-
We’ll need to create an SSH key (private/public key pair)
-
Upload the public key to GitHub (don’t upload to the repository)
-
|
Note
|
You only need one SSH key per machine per Github account and never share your private key with anyone |
-
Generate SSH key:
-
ssh-keygen -t ed25519 -C "your_github_email@example.com"(TheCis uppercase) -
Save it in your
.sshfolder for consistency (follow the presented path in the parentheses and replaceid_ed25519with a more descriptive name, likegithub_key) -
Optionally add a passphrase in the next step (will need to remake key if passphrase is forgotten)
-

Get Your Key
-
Find your public key:
-
ls ~/.ssh-
This will list the possible keys on your machine
-
-
-
Once found, output the content to the terminal
-
cat ~/.ssh/github-key.pub-
Don’t forget the
.pubat the end; you don’t want to mistakenly output the private key
-
-
The content should start with "ssh" and end with your email address (or whatever was used after
-Cin the previous step)
-

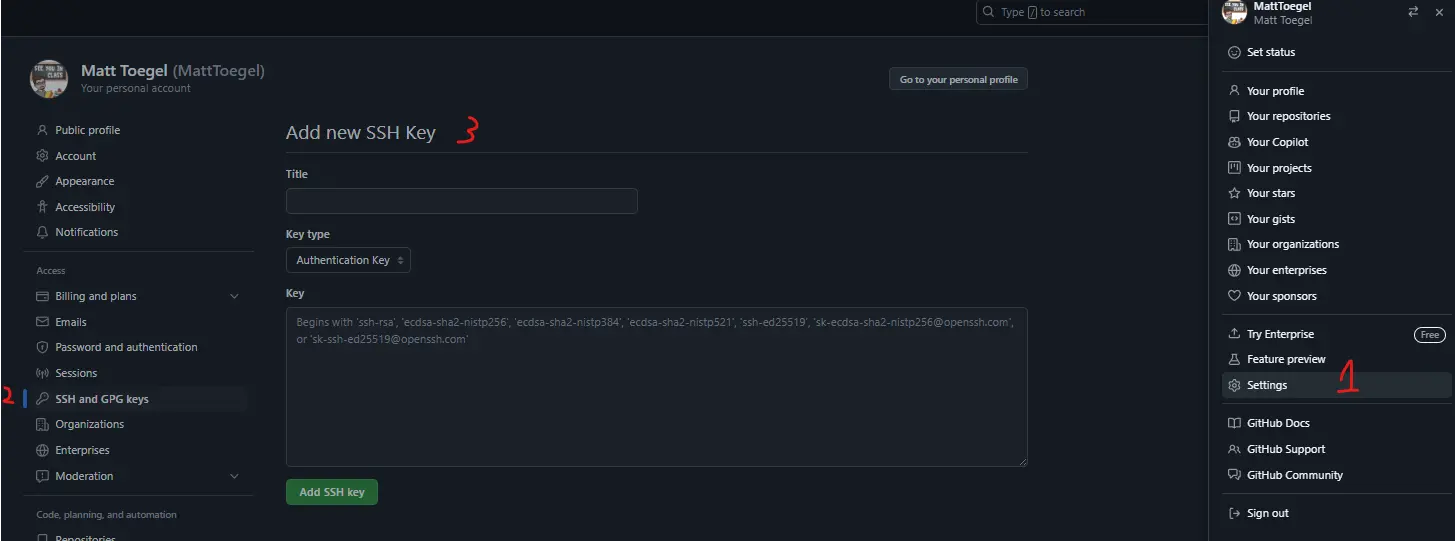
Add to Github
-
Add the public key to Github:
-
Go to Settings > SSH and GPG Keys > New SSH Key
-
Name it to identify the machine
-
Paste your public key and save
-
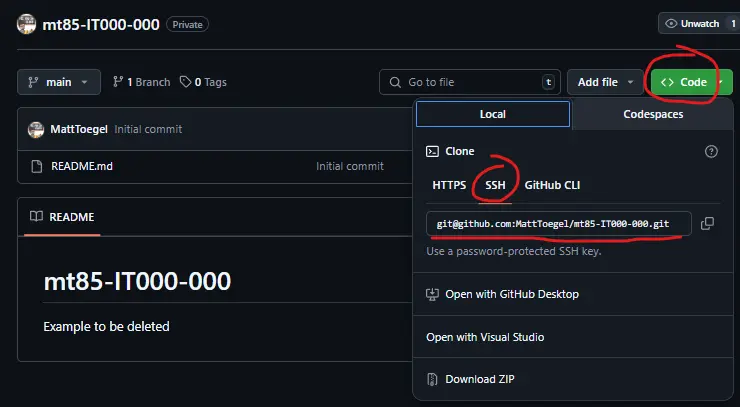
Test by Cloning
-
Clone your repository:
-
Navigate to the directory for your class content
-
I generally put mine in a dedicated folder for the semester (i.e., NJIT/<semester>/<course>/)
-
-
Open Git Bash Here
-
Run
git clone [SSH URL](use SSH, not HTTPS)
-
-
This will likely fail, if it does, pay attention to the reason and proceed to the next steps
Adding Keys to the Key Ring
-
If SSH-Agent issues occurred:
-
Start ssh-agent:
eval "$(ssh-agent -s)" -
Add your private key:
ssh-add ~/.ssh/github_key-
Note it does not end with ".pub"
-
-
-
These commands add the private key to the current terminal session, if you close it you’ll need to rerun them
-
We’ll adjust something at the end to reduce these steps
-
-
Re-Run
git clone [SSH URL]if it had failed previously (don’t rerun it if it had worked)
|
Important
|
You’ll generally only need to clone your repo once per machine, refrain from repeatedly cloning as this will cause nested repositories and cause a lot of issues if not resolved. This warning includes avoiding the usage of git init in the cloned repository directory.
|
All Set
-
Verify your setup (assuming the clone worked):
-
Navigate into your repository directory
-
Hint:
cd <your_repo_name>
-
-
Run
git statusto see git-related output
-
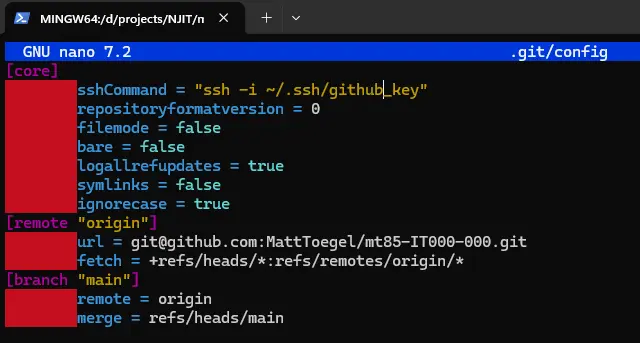
Appendix: Tell Git Which Key To Use
|
|
|
Tip
|
Alternatively you can use the following command to set the SSH key for the current repository:git config core.sshCommand "ssh -i ~/.ssh/github_key"
|